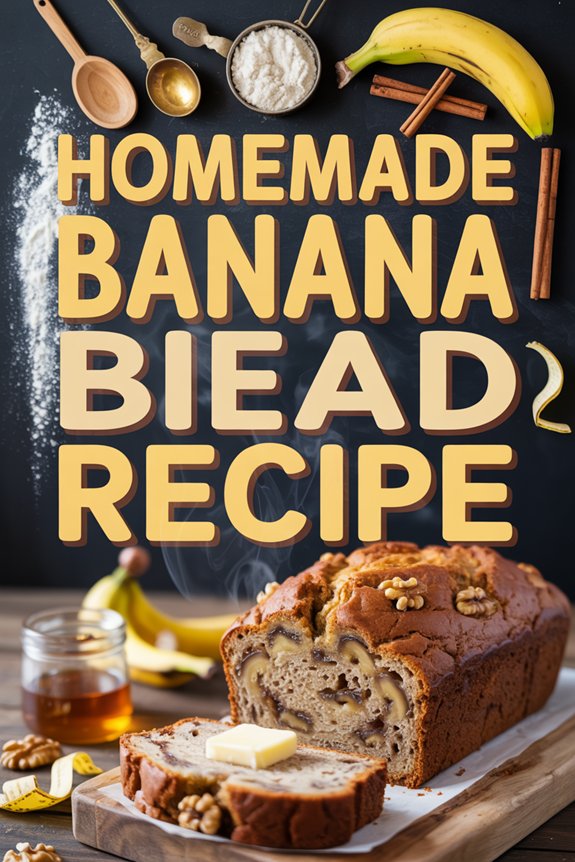
Why You’ll Love this Homemade Banana Bread
When you’re craving something warm, comforting, and deliciously simple, this homemade banana bread recipe delivers on all fronts.
I’m talking about moist, flavorful goodness that fills your kitchen with an irresistible aroma.
What makes this recipe special? For starters, it’s incredibly forgiving.
Using those spotty, overripe bananas sitting on your counter? Perfect. The natural sweetness intensifies as bananas ripen.
Plus, with the option of adding chopped peanuts or cashews, you’ll get that lovely textural contrast.
Tender crumb, nutty crunch. Could banana bread get any better?
What Ingredients are in Homemade Banana Bread?
The beauty of banana bread lies in its simplicity. With just a handful of pantry staples and those overripe bananas you were thinking about tossing out, you can create something truly magical. No fancy equipment or specialty ingredients required—just good, honest components that work together to create that tender, moist loaf we all crave on rainy afternoons or sunny mornings alike.
- 1 1/2 cups flour
- 3/4 cup sugar
- 1/4 cup cooking oil
- 2 tablespoons water
- 3 1/2 teaspoons baking powder
- 1/4 teaspoon baking soda
- 3 bananas
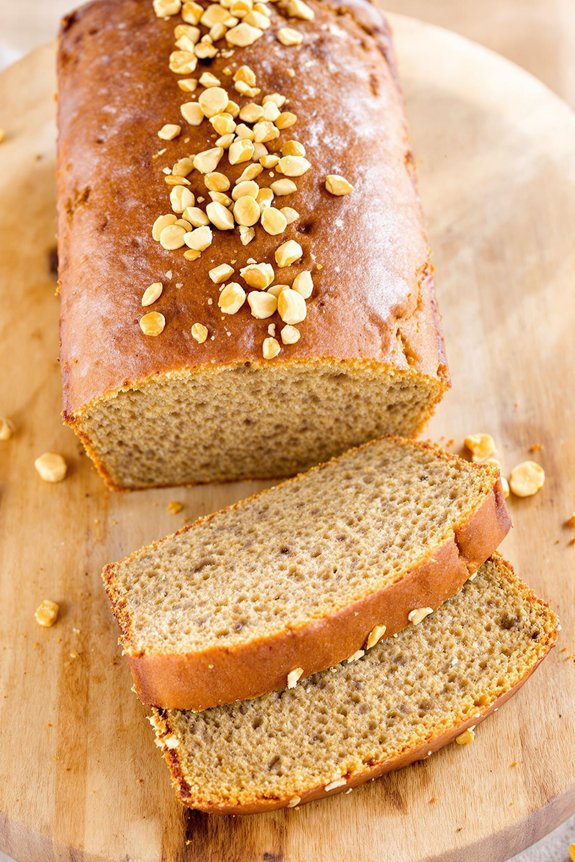
- 1/2 cup chopped peanuts OR 1/2 cup chopped cashews
When selecting your ingredients, remember that the ripeness of your bananas matters tremendously. Those spotty, almost-too-far-gone bananas? They’re banana bread gold. The darker the peel, the sweeter and more pronounced the banana flavor will be in your finished loaf. And don’t feel limited by the nut options—while the recipe calls for either peanuts or cashews, you could certainly substitute walnuts or pecans if that’s what you have on hand. Or, if you’re dealing with nut allergies, feel free to skip them altogether. The bread will still be wonderfully moist and flavorful, just with a slightly different texture profile.
How to Make this Homemade Banana Bread
Making this banana bread couldn’t be more straightforward—it’s the kind of recipe that reminds us why homemade treats are worth the small effort.
Begin by gathering all your ingredients in one place: 1½ cups flour, ¾ cup sugar, ¼ cup cooking oil, 2 tablespoons water, 3½ teaspoons baking powder, ¼ teaspoon baking soda, 3 ripe bananas, and ½ cup of either chopped peanuts or cashews.
Place everything into a large mixing bowl—yes, everything at once, which makes this possibly the easiest quick bread you’ll ever make. No need for the traditional creaming-and-folding dance that many recipes demand.
When you start mixing, the batter might initially seem a bit dry and you might wonder if you’ve done something wrong. Don’t worry, this is completely normal. Just keep mixing until the ingredients come together into what the recipe describes as a “pasty liquid.”
Those 3 bananas will release their moisture as you stir, transforming the mix into the perfect consistency. Once thoroughly mixed, transfer your batter into a lightly greased loaf tin.
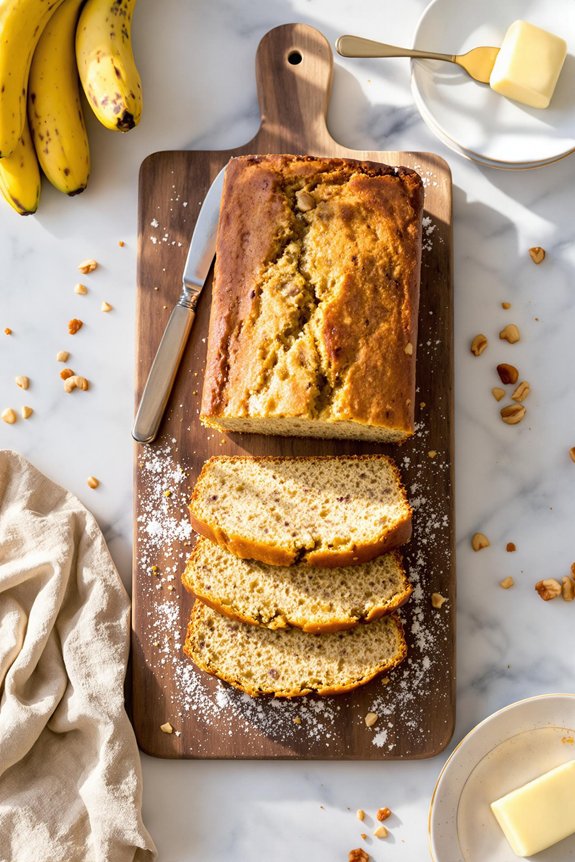
Pop it into a preheated oven at 175°C (about 350°F for my American friends) and bake for 45 to 50 minutes. How do you know when it’s done? The old toothpick test never fails—insert it into the center of your loaf, and if it comes out clean without any wet batter clinging to it, your banana bread is ready to emerge from the oven.
For an even better baking experience, consider investing in a premium cookware set that ensures even heat distribution and perfect results every time.
Remember that little tip about banana ripeness? It bears repeating. For the tastiest result, use those bananas that have gone spotty and soft—the ones that make you think twice about eating them straight.
The darker they’re (without being actually rotten, of course), the more intense banana flavor they’ll impart to your bread. And while the recipe doesn’t mention it, I always let my banana bread cool in the pan for about 10 minutes before transferring it to a wire rack.
This cooling period helps the loaf set up properly and prevents it from breaking apart when you remove it. Soon enough, you’ll be slicing into a warm, fragrant loaf that fills your kitchen with the comforting aroma that only homemade banana bread can provide.
Homemade Banana Bread Substitutions and Variations
While this banana bread recipe is delicious as written, one of the joys of home baking comes from making a recipe truly your own.
I’m a firm believer in kitchen creativity, aren’t you?
Try swapping the peanuts for walnuts, pecans, or even chocolate chips for a different crunch.
Not a nut fan? Simply omit them.
You can add a teaspoon of cinnamon or vanilla extract for warmth, or fold in dried fruit like cranberries.
For dietary needs, substitute gluten-free flour, replace sugar with honey, or use coconut oil instead of cooking oil.
The riper your bananas, the sweeter your bread.
What to Serve with Homemade Banana Bread
Four delicious companions can transform your slice of banana bread from a simple snack to a memorable treat.
I love pairing mine with a generous smear of cream cheese or mascarpone—the tangy creaminess perfectly balances the bread’s sweetness.
A drizzle of warm honey or maple syrup creates a heavenly combination when you’re craving something extra indulgent.
Can’t decide between sweet and savory? Try a slice with sharp cheddar cheese for a surprisingly delightful contrast.
For breakfast, serve alongside fresh berries and Greek yogurt.
The fruity tartness cuts through the rich banana flavor, making every bite more interesting.
Final Thoughts
Baking this homemade banana bread has truly become one of my favorite weekend rituals. There’s something magical about transforming those spotted, overripe bananas into something so deliciously comforting.
The recipe is wonderfully forgiving—perfect for both novice bakers and seasoned pros.
What makes this banana bread special? Perhaps it’s the simplicity, or maybe the versatility. You can dress it up with nuts or chocolate chips, or keep it classic.
Either way, the warm, sweet aroma filling your home is worth every minute spent in the kitchen. Isn’t that what comfort food is all about?